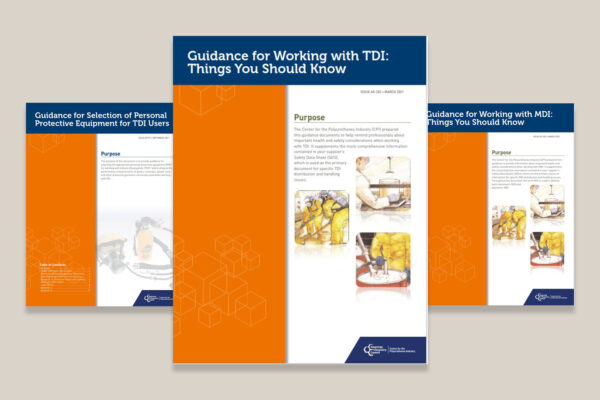
DIY projects around the home can include small weatherization jobs using a convenient insulating foam sealant product in an easy to use, small can (typically 12-24 oz.). Insulating foam sealants (also known as “foam in a can” or “one-component foam”) are a type of spray polyurethane foam (SPF) product and are readily available at home improvement stores. These products are intended for use in a “bead type” application for air sealing or adhering. Their small volume, ease of use, and portability make them well-suited for smaller projects, such as sealing gaps and crevices, tackled by the DIYer.
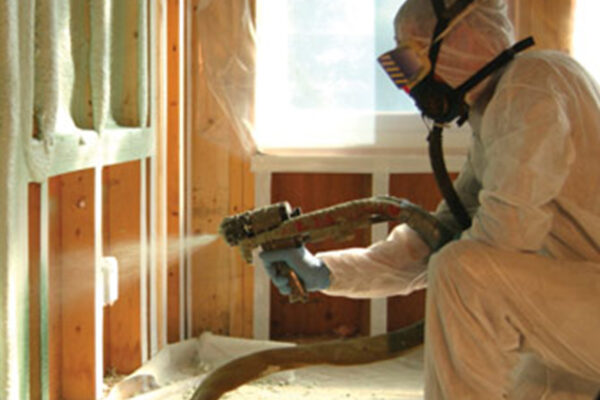
It’s important to note that, unlike insulating foam sealants that can be used by a DIYer and without specialized training, products called low-pressure, two-component SPF (typically used on larger insulation projects and sold in kits or refillable cylinders) require training and certification. They are often used by weatherization contractors and SPF professionals.
What to Know Before Starting an SPF Installation
These are some topics to consider before attempting to pursue a low-pressure, two-component SPF installation project as a DIYer:
When to Consider Hiring a Professional
Insulating foam sealant products sold in aerosol cans designed for DIYers are not intended to be used as insulation for larger areas or projects. There are other types of SPF designed for mid- to larger-size insulation projects.
For mid-size projects, there are low-pressure, two-component kits that may require further training and specialized PPE to use them properly and safely. These low-pressure kits are primarily used by weatherization professionals and SPF contractors to insulate and seal small to mid-size areas around the home, such as attics, crawl spaces, and rim joists.
High-pressure, two-component SPF systems are more often used when insulating larger areas, such as walls and roofs on new construction or major renovations. These products are not for DIYers and are designed for professional use. These systems require special training and the use of PPE, including respirators. When high-pressure two-component spray polyurethane foam insulation is needed, the use of a SPF contractor having the proper training, equipment and personal protective gear to handle these large-scale projects is important.
For more details, visit Selecting an SPF Contractor or the Spray Polyurethane Foam Alliance also provides information on how to find a contractor.
Typical Uses for Insulating Foam Sealant
Many home improvement centers and hardware retailers sell insulating foam sealant products in 12-24 oz. cans. These products are useful for small DIY projects such as sealing holes, gaps, and crevices around your home where air leakage could occur. There are different grades of insulating foam sealants for different uses. Refer to the product label for information on appropriate product uses and check with the product manufacturer if you have questions about its intended use.
Interior Uses
- Living Spaces: Seal gaps behind baseboards, window and door frames, wire and pipe penetrations, air vents, and around the sides of (not inside) electrical boxes.
- Sink Plumbing: Seal by filling the gap between the wall and the pipe.
- Dryer Vents: Seal from either the interior or exterior of the penetration, depending on which has easier access.
- Sill Plate: Seal around the wood framing of the walls of an unfinished basement where the wood 2” x 4” or 2” x 6” meets the poured concrete foundation wall.
- HVAC Penetrations: Seal between the penetration and duct work from the attic to the ceiling registers on the top floor of the house. Seal between the gap around the floor registers and duct work in the basement.
- Attic Hatch: Seal the attic hatch door from the living space by going into the attic and filling the gap between the frame of the attic hatch door and the attic floor.
- Basement/Attics: Seal pipe and duct penetrations, plumbing shafts and stacks, wall cracks, sill plates and floor/wall junctions.
- A/C Wiring: Seal the gap between the pipe and the wall where the cooling line from the A/C condenser (look for a copper pipe) enters the basement from the outside of the house. It can be found near where the air conditioning unit sits on the ground.
Exterior Uses
Follow the manufacturer’s instructions for application. It can be helpful for exterior applications to paint the surface to be treated with black paint (appropriate for outdoor use and the surface selected) to help prevent UV degradation and discoloration of the foam.
- Where siding meets the foundation
- Electrical, gas, and air conditioning penetrations
- Garage ceiling and wall joints
- Around outdoor faucets and vents
- Landscaping applications, such as stone wall repair, securing landscape blocks, as well as for pond and waterfall fillers and repair
Insulating Foam Sealant Ingredients
A can of insulating foam sealant contains a group of chemicals referred to as a prepolymers, which is formed in the can when chemicals are added at the manufacturing site. These chemicals include polymeric methylene diphenyl diisocyanate (pMDI) and a resin blend that may contain a mixture of polyols, catalyst (primarily amines), hydrofluorocarbon or hydrocarbon propellant, surfactants and flame retardants. See the manufacturer’s label for specific product contents since they may vary slightly depending on the type of insulating foam sealant. When the prepolymer combines with moisture in the air, a reaction occurs to create the foam. Before the foam has sufficiently hardened, there may be potential for exposure to these chemicals. Therefore, it’s important to follow the safety precautions and wear the protective gear (e.g., glasses/goggles, gloves and full- coverage clothing) as described on the product label.
Guidance on Using Insulating Foam Sealant
Here are a few key considerations when using insulating foam sealant:
- Follow instructions on the product label. Read and follow all instructions on the product label carefully.
- Provide ventilation: Provide plenty of ventilation to avoid breathing vapors and mist until the foam has hardened.
- Wear appropriate protective gear. It is important that you wear protective gear, often referred to as “personal protective equipment” (PPE), when applying insulating foam sealant. Wear the clothing and eye protection recommended by the product manufacturer on the label. This can be safety glasses or goggles, full-coverage clothing, e.g., long sleeves, and gloves. Avoid getting foam on your skin or in your hair. (The foam is highly adhesive and very difficult to remove). Learn more.
- Keep children and pets away while spraying. Keep children and pets away from the area where you are applying the product during application and an appropriate time after.
- Shut off ignition sources. Be thoughtful about addressing potential combustion risks. Extinguish heat sources, sparks and open flames in the spray area, adjacent rooms and behind neighboring walls. This includes pilot lights to gas stoves, dryers, furnaces and water heaters. Keep the area free from ignition sources until fumes have dissipated. Refrain from smoking while spraying the foam.
- Avoid spraying in high heat areas. The unreacted chemical constituents in the can and the cured foam may be combustible, so you should carefully read the instructions on the product label and follow them with respect to avoiding installations in areas exposed to high heat, such as around fireplaces, heaters, radiators, heat lamps, recessed lighting, bare copper wires, or inside electrical boxes.
Note: Insulating foam sealants typically contain flame retardants and when installed properly, are designed to meet building and fire code regulations. Installed cured product is combustible and will typically begin to thermally degrade at temperatures above 240ºF/116ºC.
- Clean up the work area, including any foam trimmings. Insulating foam sealants generally do not need trimming, because the product is applied in a narrow “bead.” However, if you wish to trim the applied product, it is good practice to wait until the foam has cured or hardened before attempting to trim it. Consult the product label and instructions for trimming information and cure times. Cured or “hardened” foam trimmings may be disposed of as you would other household wastes. Be sure to thoroughly clean up the work area after the job is completed.
Note: Generally, it is considered acceptable to leave cured or “hardened” insulating foam sealant exposed when it is used to seal small gaps and cracks. However, in the unlikely event that it is used for larger area applications (e.g., greater than about 2 square feet), consider a consultation with your local building code official, or work with a professional weatherization or spray foam contractor, who understands local building code requirements for foam plastics.
Generally, people can reenter the area when the insulating foam sealant has hardened to the point where it is considered “tack free” (no longer wet or sticky on the surface). Typically, it can take between five and 60 minutes for the foam to become tack-free. Wearing appropriate protective gear (for example, eye protection, full-coverage clothing and gloves) will minimize exposure when checking the foam’s hardness or “tack-free” state.
The amount of time it takes for a foam to cure or harden varies depending on the product-specific formulation, temperature, humidity, the amount of foam being sprayed, and other variables. Typically, insulating foam sealants cure quickly at moderate temperatures and humidity. The foam surface cures first, and then gradually cures inside of the foam. The thicker the foam is applied, the longer it takes to cure throughout. Spraying a mist of water on the substrate or/and between layers of foam can speed up the curing process. Full cure may be reached in a time range of about eight to 24 hours, depending on the product and site conditions. Consult the product label and instructions regarding cure times.
Refer to the product label for first-aid instructions. Keeping the instructions on the product label unobstructed (clearly readable) at the project site helps in the event that first-aid guidance is needed.
Empty cans may be disposed of as non-hazardous household waste or recycled. For full or partially used cans of insulating foam sealant, follow the product label instructions regarding storage and disposal. The ingredients in the can are pressurized, so upright storage of the can at room temperature consistent with the manufacturer’s recommendations is important (avoiding freezing or hot temperatures). Remember that the temperatures in a parked vehicle in the summer can rapidly reach very hot temperatures, so plan your purchase and transportation of the insulating foam sealant accordingly.
After initial use, a partially used can of insulating foam sealant may be re-used for a limited time (typically up to 15 days) if stored in cool and dry conditions.
Disposal of full or partially used insulating foam sealant cans must be in compliance with all federal, state/provincial and local laws and regulations. Regulations may vary in different locations. Call the product manufacturer for instructions.
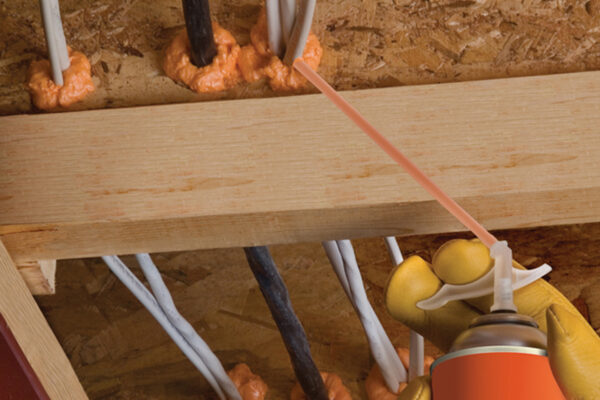
A DIYer can tackle small weatherization projects in the home using a convenient insulating foam sealant product.
Frequently Asked Questions for DIYers
General FAQs
What is insulating foam sealant?
Insulating foam sealants are a type of spray polyurethane foam (one component foam) that has insulating, air sealing, and adhesive properties. Insulating foam sealants are available at home improvement stores and come in small cans (typically 12-24 oz.). These products are intended for use in a “bead type” application for air sealing or as an adhesive. Their small volume, ease of use, and portability make them well-suited for smaller projects tackled by the Do-It-Yourselfer. They are typically dispensed using a straw or small dispensing gun. These “canned” foam products have specific safety information on the label that should be carefully followed.
Where can I apply insulating foam sealant?
Insulating foam sealants are useful for small DIY projects such as sealing holes, gaps and cracks around your home where air leakage could occur. Some possible areas to consider sealing around include:
- Window and door gaps
- Baseboards and vents
- Sill plates, pipe and duct penetrations
- Sink plumbing, floor/wall junctions, around electrical boxes (not inside)
Can I use insulating foam sealant outside?
Yes, you can. Exterior uses could include the following:
- Where the siding meets the foundation
- Gas and electrical penetrations
- Garage ceiling and wall joints
- Around outdoor faucets and exterior vents
- Landscaping applications such as stone wall repair, pond/waterfall fillers and repair, as well as to secure landscape blocks
Are there specific tips for using insulating foam sealant?
Are all insulating foam sealants basically the same?
No, not necessarily. There are different grades of insulating foam sealants for different uses. Refer to the product label for information on appropriate product uses. For more information, see “Typical Uses for Insulating Foam Sealant.”
Does the insulating foam sealant help control moisture in my home?
Gaps and cracks in the home can allow uncontrolled movement of moisture-laden air in and out of the building. Loss of interior moisture control can make the interior air excessively dry or moist, which can cause occupant discomfort, poor indoor air quality, higher heating and cooling costs to control moisture, and in some cases, hidden deterioration of the building and possibly mold and mildew growth. Air sealing these gaps and cracks with insulating foam sealant can help control interior moisture levels (other measures, like having the walls insulated with SPF can help a great deal more).
Can I use insulating foam sealant for projects other than its stated use?
Use insulating foam sealants for the uses described by the manufacturer on the product label. Please note that insulating foam sealants are not intended for use by children. Check with the product manufacturer if you have questions about its intended use.
What are the energy efficiency benefits of insulating foam sealant?
- Reduce heating and air conditioning equipment size
- HVAC sizing can be reduced as much as 35% without the loss of efficiency and comfort. (Source: Canadian Urethane Foam Contractors Association)
- Reduce drafts, noise and increase comfort
- Insulating Foam Sealant is an effective air barrier.
- Insulating Foam Sealant is commonly used to prevent drafts from windows, doors, attics and floor boards creating a more comfortable indoor environment.
- Insulating Foam Sealant helps minimize air-borne sound transmission.
- Impede entry of insects and pests
- Sealing gaps with Insulating Foam Sealant from the outside provides a barrier against insects and other pests where it is applied.
- Minimize air infiltration that can generate condensation and result in mold growth
- Moisture and humidity inside the home can lead to mold growth. Gaps and cracks in the building structure and condensation on windows can keep the humidity high and support mold and mildew growth. Left unchecked, mold and mildew can cause wood to rot. Air sealing the gaps between the attic and living space can help manage moisture and humidity issues.
- Resist settling due to its general stability
- Typically, Insulating Foam Sealant is not subjected to structural deterioration/decomposition and resists settling.
- Qualify for utility rebates, tax credits and green certification
- The energy savings obtained by air sealing homes is significant enough that the purchase and use of Insulating Foam Sealant products may qualify for tax credits under the new American Recovery and Reinvestment Act of 2009. Check with the manufacturer for confirmation that the specific Insulating Foam Sealant product qualifies for the tax credit and for further information and instructions on filing for the credit.
- Many local utility companies offer rebates for energy efficiency upgrades. Check with your utility provider for eligibility.
- To learn more about federal tax credits for energy efficiency, you can visit the ENERGY STAR web site on Federal Tax Credits for Consumer Energy Efficiency.
For new construction or major remodel projects, the use of Insulating Foam Sealant may help earn energy-efficiency credits under residential green certification programs. A few sources you can visit include: Green Globes, U.S. Green Building Council – LEED (Leadership in Energy and Environmental Design), and National Association of Home Builders – information on scoring details.
Application FAQs
How do I prepare the area where I’ll be applying the insulating foam sealant?
Read and follow all instructions on the product label. This includes following the product manufacturer’s instructions about ventilating the room in which the project will be done. It also includes wearing personal protective equipment (generally, safety goggles or safety glasses, and gloves), and work clothing, such as a long-sleeved shirt to minimize contact with skin. Product manufacturers recommend that the product not be used by children and that children not come into contact with the product.
Can I use too much? Is it possible to seal the house too tightly?
Given the small volumes of foam used when filling cracks and gaps in your home as a DIYer, it’s unlikely you will seal your house too tightly. However, you may want to consider discussing your project with an architect, building design engineer, weatherization professional, or your local building code officials if you have questions. Proper ventilation in a home or building is very important. You may also wish to consider having a heating and cooling technician check large appliances (e.g., water heater, dryer) after air sealing to make sure they are venting properly.
Can I leave the cured sealant exposed?
Generally, it is considered acceptable to leave cured or “hardened” insulating foam sealant beads exposed when it is used to seal small gaps and cracks. Manufacturers may recommend painting the material if it is exposed to UV light.
Do I need to trim the foam? When can I trim it?
Insulating foam sealants generally do not need trimming because the product is applied in a narrow “bead.” However, if you wish to trim the applied product, it is good practice to wait until the foam has cured or hardened before attempting to trim it. Consult the product label and instructions for trimming information and cure times.
How should I dispose of the trimmings from insulating foam sealant?
Cured foam trimmings may be disposed of as you would other household waste. Be sure to thoroughly clean up the work area after the job is completed.
Safety FAQs
The can is filled with a group of chemicals referred to as polymeric methylene diphenyl diisocyanate (pMDI) and a resin blend that may contain a mixture of polyols, catalyst (primarily amines), hydrofluorocarbon or hydrocarbon propellant, surfactants and flame retardants. See the manufacturer’s label for specific product contents since they may vary slightly depending on the type of sealant. When these chemicals are combined during manufacture, a reaction occurs to create a prepolymer in the can that subsequently reacts with moisture in the air when it is dispensed—this is what creates the insulating foam sealant. Before the foam has sufficiently hardened, there may be potential for exposure to these chemicals. Therefore, it’s important to follow the safety precautions and wear the protective equipment (e.g., safety glasses/goggles, gloves and full- coverage clothing) as described on the product label.
Yes, it is important to wear protective gear, often referred to as “personal protective equipment” (PPE) when applying insulating foam sealant (sometimes referred to as “one component foam” or “foam in a can.”) Wear the gloves, clothing and eye protection recommended by the product manufacturer on the label. This often includes safety glasses or goggles, full-coverage clothing such as long sleeves, and gloves. Learn more.
Is it safe for others to be in the vicinity while I’m applying insulating foam sealant?
Follow the product manufacturer’s instructions. Keep children and pets away from the area where you are applying the product. When applying insulating foam sealant, a few considerations include:
- Avoid getting foam on your skin or in your hair. (The foam is highly adhesive and very difficult to remove).
- Provide plenty of ventilation to avoid breathing vapors until the foam has hardened.
- Refrain from smoking while spraying the foam and turn off all pilot lights and other sources of ignition.
What should I do if the foam accidentally contacts my skin or eyes during application?
Immediately remove it from the skin without spreading it before it hardens. Refer to the product label for first aid instructions. Keeping the instructions on the product label available and readable at the project site helps in the event that first aid guidance is needed.
How do I know the foam has cured or “hardened” so that my family can reenter the project area?
Generally, people can reenter the area when the insulating foam sealant has hardened to the point where it is considered “tack free” (no longer wet or sticky on the surface). The amount of time it takes for the foam to cure or harden varies depending on the product-specific formulation, temperature, humidity, the amount of foam being sprayed, and other variables. Typically, insulating foam sealants cure quickly at moderate temperatures and humidity. The foam surface cures first, and then gradually cures inside of the foam body. The thicker the foam is applied, the longer it takes to cure throughout. Spraying a mist of water on the substrate or/and between layers of foam can speed up the curing process. Typically, it can take between 5 and 60 minutes for the foam to become tack-free. Full cure may be reached in a time range of about 8 to 24 hours, depending on the product and site conditions. Consult the product label and instructions regarding cure times.
Does the cured sealant pose a fire hazard?
Insulating foam are designed to meet building and fire code regulations when properly installed. Installed cured product is combustible and will typically begin to thermally degrade at temperatures above 240oF/116oC so you should carefully read the instructions on the product label and follow them with respect to avoiding installations in areas exposed to high heat, such as around fireplaces, heaters, radiators, heat lamps, recessed lighting, bare copper wires, or inside electrical boxes. In addition, the product cans should not be stored in high heat areas or near heat. Cured foam will burn when exposed to a direct flame. Finally, it is important to not do any welding/torch cutting or use a heating appliance that produces a flame near cured foam that is not protected by an ignition barrier (e.g., drywall).
What do I do with partially used or empty insulating foam sealant cans?
Empty cans may be disposed of as non-hazardous household waste or recycled. For full or partially used cans of insulating foam sealant, follow the product label instructions regarding storage and disposal. The ingredients in the can are pressurized, so upright storage of the can at room temperature consistent with the manufacturer’s recommendations is important (avoid freezing or hot temperatures). Remember that the temperatures in a parked vehicle in the summer can rapidly reach very hot temperatures, so plan your purchase and transportation of the insulating foam sealant accordingly.Disposal of full or partially used insulating foam sealant cans must be in compliance with all federal, state/provincial and local laws and regulations. Regulations may vary in different locations. Call the product manufacturer for instructions.